Top Radiator
Bottom Radiator
Heater Matrix exit
Heater Matrix entrance
Thermostat to Water Pump x 2
That was back in 1995/6 and over that time some of the hoses have aged, judging by how some aged better than others, I think that one or two were a poor quality reproduction.
Anyway, I decided that it was time they were all changed. Sometimes, as I've just found out, some things on an old car should be changed just for the sake of it! especially if it's been along time. That way things don't seize up!
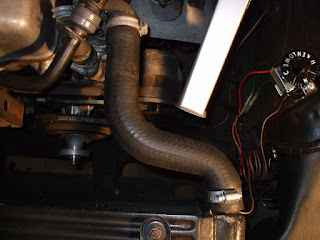
The two hoses that connect the thermostat to the water pump - used for either the heater matrix return, or for the normal water return when the thermostat is closed can be a bit of a dog to change. Well the top one is OK, but the bottom one is really awkward. I remember last time it was a swine! So I decided to remove the elbow that joins these two hoses together. You can just make out the top of these two hoses from this photo, just to the left of the top of the main radiator hose - click on the photo to enlarge it! I'd got plenty of gaskets for this as it's never been off in 38 years, I should have been prepared.........

I gave the bolts a good squirt of WD40 and then I took one bolt out, fine. Then the other....not fine, the head of the bolt was in my spanner, and the bolt still in the head - Sod It (or other expletives!).You can see in the photo on the left the bolt still sticking out on the left hand side. Ignore the white stuff, that's just rag in the thermostat housing and hose to keep the dirt out.
I decided that the best course of action would be to soak the bolt in WD40 for a few days and see if I could get some nuts. I checked the thread with a thread gauge which was 20 TPI, that made it a ¼UNC thread. I popped into my local hardware store (well local to where I work) Pollards in Fenny Stratford near Milton Keynes. Superb shop, real old fashioned place where you can buy anything from 1 screw to a few pounds (or should that be kilos) of screws! They had imperial nuts in stock. I found out that UNC and Whitworth are almost identical (apparently with the exception of ½" version for some reason. So armed with two nuts, I started on my next cunning plan - to tighten two nuts against each other on the remaining half inch of bolt sticking out to create a pseudo bolt head to use to undo it. I also popped into Halfords to buy some Shock and Unlock which I'd seen advertised in Practical Classics - the idea being to shock the bolt with a freezing spray which makes small cracks in the crud holding the bolt for penetrating oil to seep in to. Sounds good so far.
I'd been spraying it with WD40 for a couple of days - each time I went outside and was starting to feel lucky. Fastened the two nuts on, and with a small spanner - so as not to put too much torque on the bolt, gently rocked it backwards and forwards, starting with a tightening motion - apparently that's a good move to start. It felt good, a small bit of motion, kept spraying it and took all evening gently moving it a fraction backwards and forwards, then...........
Oh Sod in Hell, it's sheared again!
There is now only one thing for it, I have got to drill it out. I've been searching the internet on how do I do this. I've also been reaching out to friends (Pilkie!) for advice on what to do.
So, next plan. I've bought a new drill (old one broke last year) a new set of imperial drill bits and some easy-outs. I will be very careful with the latter - stories on the internet suggest that they are made of hardened steel, and if they're snapped off - you wont be able to drill them out! Better not do that then.
It seems that the best thing to do is to find the middle of the bolt as best I can, centre punch, and then start with a 2mm drill and gradually increase the diameter until you get within 1mm of the thread. I'll then try with the easy-outs (gently) and if the heat and vibration from drilling has broken the hold I might be in luck. otherwise, I'll try the next size drill up - probably an imperial one that is inbetween the metric sizes - if I have one that wont drill through the threads!, and if that doesn't work, I'll use my Black & Decker Wizard to grind the last bit away until I'm really close to the thread. Then I'll either easy-out again, or pick the threads out! This time I'll win!
Saturday 7th March 2009
Right, today's the day. I'm either going to succeed, or ruin my cylinder head!
I followed my instructions, some came from my mate Pilkie, some from the internet, and some out of my head!
I found the centre of the stud. I'm a bit of a perfectionist sometimes so I used a thingy out of my daughters old pencil case - bit like a compass but with two points instead of one point and a pencil. Anyway I found the centre - fat lot of good it did, I still ended up off centre!
I started with a 2mm drill, then I found out just how hard these studs are. I also realised just how much I'd abused my drills over the years - so, I turned to my brand new imperial drills - nice and sharp! The first drill is the most important, this is the guide for all others. I had to carefully keep the drill horizontal and straight through the stud. After all, don't want to end up drilling into the water jacket do I!
I went to a bigger and bigger drill size, until I got to this stage - as you can see, for some reason my hole is getting more and more off centre - how does it do that?
Before I started, I measured the depth of the thread that was OK (on the right), which is ¾". That's good because I only need ½" of thread for the bolt, so there's ¼" space at the end of the broken stud. I don't have a depth guage on my drill, so I used a piece of red insulation tape wrapped around the drill as my guage. You have to be careful doing it this way though as when you get to that depth, the red 'flag' will be pushed back along the drill, care is the order of the day. Well the whole day really.
As I'd reached the end of the road as far as drilling goes, I tried with the easy-outs. This was difficult as the only one that would fit in the hole, woudn't fit very well in my tap holder (shank was too small). It didn't look like it was going to move, so I reached for the Wizard! The Black & Decker Wizard is a bit like a Dremmel, I've used it a bit in the past, but today, it really earned it's keep. There's a bit that I always thought was for engraving, but it's better than that, it ground its way through the bolt slowly but effortlessly. I used it to grind the stud away and enlarge the hole.
I kept going with the Wizard until the ridges of the thread started to be exposed, I kept looking in the hole with a mirror and a flashlight (point the flashlight in the mirror!). When enough thread ridges at the entrance to the hole had been exposed, I started with the tap, slowly turned the tap a little
forwards and alot back to gently bite into the thread and also clear the swarf. Besides, it'd be bad if the tap broke!
When it didn't want to turn any further, I went back to the Wizard and ground a bit more away.
This is a sod of a stud to remove, nothing will make it budge! The only thing removing this stud is the tap to cut it out!
5 hours later Ta-Da! All done. Well, I did have to remove the radiator and alternator brackets before I started drilling, and then when it's the first time I do a job that feels like open heart surgery, I always adhere to the "measure twice, cut once" rule.
Do I feel Proud of myself or what!!
No comments:
Post a Comment