Sunday 20 July 2008

Balancing Twin Carb Throttles

After using the TetraBoost to give the old girl the equivalent of 5 star fuel, I thought I'd better give her a good tune up to make the most of this new found fuel.
I've spent years struggling with twin SU carbies, they're a bugger to get right. Oh I've got all the DIY tools - Gunsons Colortune and CarBalancer. Colortune is fine, there's no problems with that, it's balancing the throttles thats a real pig.
The CarBalancer has a rubbery thingy to shove in the venturi of the carb to make an air tight seal and force all air entering the carb to go through the tool for measuring. That's fine in principle but the threaded studs that fasten the air cleaner box onto the carbs are in the way and getting a good seal is pretty much impossible. I know purists will say that it should be done by ear, listening to the suck from each in turn, but although I'm a bit musical and have an ear for music, I obviously don't have an ear for sucking (take that anyway you like!!)
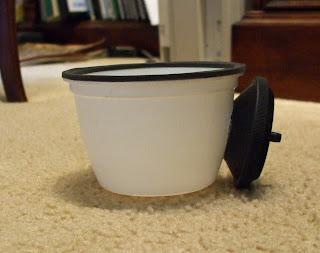
I've been trying to think of a way around this, and here's my home made add-on for the CarBalancer. It's made in true Blue Peter style (no, not with an egg box and a wire coat hanger) but with a Christmas Pudding bowl! It was a small Christmas Pudding and the plastic bowl that it came in says on the bottom that it holds ½ pint.
Anyway, I carefully cut a hole in the side of the bowl and glued the CarBalancer air inlet into this hole, when dry, I sealed the inside and outside with kitchen/bathroom sealant. Then around the top of the bowl, where it would be held against the carburettor venturi, I glued draught excluder foam so that I could be sure I was getting an air tight seal.
The beauty of this design, is that the air cleaner box studs now go inside the bowl and a true air tight seal is made.

Here are the photos, it works superbly - make one yourself!


And so you can get some feel for it, Here's a photo of the carburettors, you can see there is almost no room between the carbs and the inner wing - just enough for a slim air cleaner box!


And here with the air cleaner box removed, you can see the problematic studs:

And finally with my creation held against the carburettor - Excellent!


Petrol Additives

Since the demise of leaded petrol, the classic car community has had to either spend loads of dosh on having the cylinder head converted to unleaded, or use bottles of additive to provide the necessary valve seat protection. Fortunately the Federation of British Historic Vehicle Clubs (FBHVC) did loads of testing of these different formulas and I chose to use Superblend Zero Lead 2000 as it was the best performing additive in the tests.
Some time ago, I bought a good batch of this additive on eBay and recently found that I was coming the the end of my bottle. As far as I could find on the internet, Superblend is now produced by Morris Lubricants and they call it SuperClean Zero Lead 2005. A quick phone call confirmed that the receipe had changed although they did say that it did not alter the valve seat protection offered. To me however, a change is a change and therefore it should be retested. A quick look on the FBHVC website and it didn't appear to be in their list of approved products.
I posted a topic on the P6 Rover Owners Club (P6ROC) website forum, and was told about the TetraBoost additive that recreates proper leaded petrol. This stuff is proper Tetra ethyl lead, which is added to the tank at fill up time. Not only am I now getting proper valve seat protection, but an octane boost to boot. By adding this product to SuperUnleaded (99 Octane stuff from Tesco or Shell), I end up with 101 octane leaded fuel. That is better than the original 5 star petrol that my car was built for and not seen since the 70's!
I took her out for a spin after filling up and within a few hundred yards the tone of the engine changed, all the rough running that I'd spent years with balancers and colourtune kits trying to get rid of just disappeared! She had become more responsive and I had a grin from ear to ear driving my old Rover up and down the dual carriageway.
BTW TetraBoost is approved by the FBHVC for recreating leaded petrol. As far as I'm concerned, it's the only thing to use. It is a bit more expensive as it adds about 14p per litre to the cost of refueling, however, when balanced against how many miles are driven in a classic car, it is well worth the almost negligable expense. For me, it adds about £25 per year to the fuel cost over 1000 miles.

Tuesday 8 July 2008

Replacing the De-Dion

Well, the old girl's back in the garage on Monday (7th July 08). It's like painting the Forth Bridge! This time, it's the rear suspension.
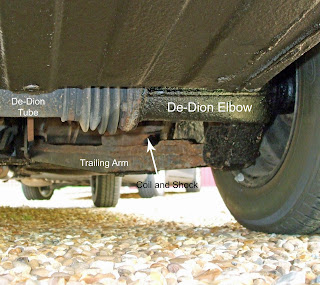
Earlier this year, I was crawling around on a cold garage floor painting underseal (that made me suffer!). By the time I got to the rear wheel arches and took the wheels off - for once actually taking in the condition of the De-Dion elbows on the hubs (you can see the elbow on the photo - It's covered in fresh black underseal!), I noticed that where the suspension trailing arm meets the de-Dion elbow, part of the elbow was broken on the off side. Not much, but there's plenty of force applied to this joint that it could break at any minute. Well, fortunately for me, I'd spotted it. Also, it could only be seen with the wheel removed - that meant that the MOT would pass with flying colours - which it did! The MOT tester is not allowed to remove any component to check the condition of the car.
Well, I've found a great friendly garage nearby - Motorvation in Northampton. I cannot recommend them highly enough as they have shown me to be decent, honest people. Anyway, I'll be taking her in on Monday and leaving her there for as long as it takes. Because she's a classic, and not required urgently, they fit her in around their normal work and take a couple of weeks or so over the job. The job gets done properly, I get a better hourly rate as she's used in 'filler' time, and the garage enjoy working on her - a proper car!
As it turns out, I always get my MOT done one month before expiry, so as it happens, she'll have her suspension fixed before the original MOT would have expired, so I don't really mind keeping that information a secret! She's still fixed as early as could be.

Here's a picture of the DeDion.
There are two elbows, one on each side. These attach to the hub and also are the points where the suspension trailling arms meet hub. In between these two elbows is the DeDion tube itself, The De-Dion tube is actually one tube inside the other, allowing the two rear wheels to move apart from each other, whilst still maintaining a parallel relationship to each other - as is required over bumpy roads! It also ensures that the road wheels are (nearly) always perpendicular to the road, thereby ensuring maximum traction to the driven rear wheels. Googling 'dedion' will give a much better explanation!
Unfortunately, as more time goes by, these components become obsolete. It is still possible to buy the De-Dion tube as a "new old stock" item, but the elbows are now restricted to good second hand items. Fortunately for us, Ian Wilson of "Rover Classics" strives to keep our vehicles on the road and has imported second hand elbows from ........ California! They are amazing, 30 - 40 years old and almost look like new (just a little surface rust). Soon, the old girl will be wearing these second hand californian elbows that have been shipped both ways across the pond! I've already covered the inside of them with Waxoyl, and the outside will be undersealed when they've been fitted.


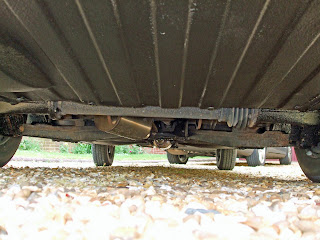
I got a phone call from the garage this morning. They've stripped her down but I need to order some locking plates for the bolts that fix the drive half-shaft onto the differential. I picked up the trailing arms to bring home to wire brush and underseal, but while I was there, I thought I'd take a few photos of the underneath of the car - you can see clearly here how the inboard discs on this car are a pain to deal with. They are bolted to the sides of the differential with the brake pads at the top. You can see the holes in the centre of the disks for the bolts to connect the half shaft between the disks and the wheel hubs.

And from either side.


Well, She's back from the garage now, and they've done a superb job - and it only cost me 4 hours labour, told you they were good! Here's a close up of the offside dedion elbow. You've got to admit, it looks very good for a 30+ year old second hand part shipped in from California!


Friday 4 July 2008

My Rover P6


Here is a picture of my car. My Rover P6.

This old girl was bought by my Grandad in April 1971. I was only 4 at the time, Grandad was 64. However, two years later, he died. The Rover was a loved and respected car in our house, and by the time I was 17 and passed my driving test, the Rover was 13 years old and the only car I really wanted to drive. The car stayed in our family, owned by by Gran, then my Mum, and then in 1995 with a genuine 59,089 miles on the clock - she became mine!

She certainly didn't look like this, underneath, the sills had taken quite a battering from the metal moth and the doors were ragged. After ages of 'little by little' saving and spending, she finally had all the rust taken out and a respray in 1996 - and still looks great 12 years later with only 64,000 miles on the clock.