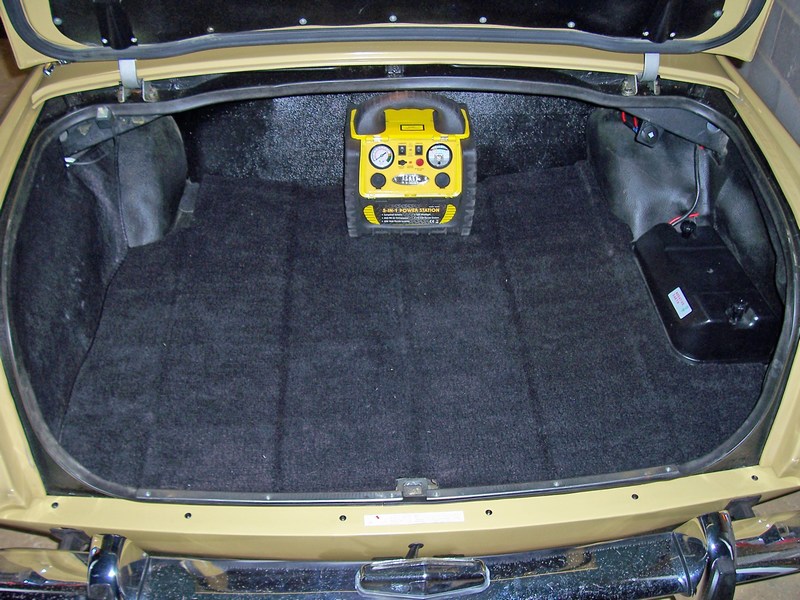
It was back in the Spring of 2009, I'd started getting fed up of the amount of free boot space the Rover didn't have. Sure, it was fine for days out where you just needed the cool box, deck chairs, table and a few other bits and pieces, but if we wanted to go away overnight then that was a different story. Generally, going away meant a suitcase (girls take loads of 'stuff'. I don't know what it is, or why we need it, but it's loads of 'stuff'), cool box, other bags of 'girls stuff', my tool bag and power station (jump starter, also good to power the cool box when parked up for a period of time!). The P6 has a very limited boot space as you can see from this picture.
<>
There are two solutions to this problem, either put the spare wheel on the floor of the boot, or put it externally on the boot lid.
Rover came up with some ingenious solutions for this, the first one, putting the wheel on the boot floor would be fine if your wheel was nice and clean so you didn't mind it coming into contact with your luggage, but what about after a wheel change.... To combat this, Rover came up with the false floor. Here you can see two photos, one showing the wheel and tool bag in the bottom of the boot, and the second with them covered up by a false boot floor.

Here you can see the false floor on the left, folded up, and the wheel , tools etc lying on the boot floor.
And here you can see the false floor laid out. It looks rather good, and it is. However, as can be seen with my power station in the boot, there is excellent width, but very little height. I can now fit a suitcase in, but no longer have the height to fit the cool box doh!!
It is a very neat, but also restricting solution.
The second type of fitment for the spare wheel, is to put it on the outside of the boot lid, thereby giving the whole width and height of the boot for luggage.
The boot mount kit consists of:
A "Spider" brace:

This brace is to replace the existing braces on the inside of the boot lid. The standard boot has two horizontal braces to give the panel strength, these need to be removed (by drilling out the spot welds) and this brace inserted in its place by using pop rivets.
This brace was a second hand (well, hardly going to find any new ones these days are you!) painted black and covered in surface rust. I took the angle grinder / flap disc to it and took it back to bare metal. Gave it a good coat of Jenolite to kill the rust, etch primed it, and then gave it a quick top coat in Almond (same colour as my P6). The colour really isn't that important as it is never seen, but I know it's there, so wanted to give it a top coat. I didn't spend alot of time on it, and it is cold outside (New Years Day 2010) so not good painting conditions, but it is the right colour, even if it doesn't gleam and shine. Damn sight better than a rusty black one!
You can see the middle of the brace has the hole for the fitting kit, and that the spare wheel therefore is actually fitted to the brace and not just the boot lid.
The boot fixing:

This part of the kit fits to the centre of the brace - you can see by the ring of holes in the brace, and matching the picture here. The top of the picture shows the stainless steel plate that is positioned on top of the boot lid. This has a bayonet fitting in the centre (looks oval in the photo) so that the spare wheel fitting is inserted and then twisted to lock. This plate is usually sealed by a sealant of some sort, I'm thinking of using the same stuff that is used to seal windscreens. On the right is a set of four shims (two thick, two thin) these are used as required to fit between the spider brace and the underside of the boot lid to take up any space. The black ring on the left is the locking mechanism. This contains the thread for the knurled wheel (below) to screw the wheel to the boot lid, and also contains a locking mechanism to prevent anyone stealing your spare wheel. This locking mechanism is fitted underneath the spider brace. All these items are screwed together using #10 UNF countersunk screws and nylock nuts.
The "Cup":

The cup is an often misplaced or forgotten item when searching for the boot mount kit. Many old P6's, if they don't have the spare on the boot, but do have the facility, have often 'lost' the Cup, or the people breaking the car for the sale of the parts, often don't understand the significance.
You can just make out on the underside, there is a bayonet fitting that will mate with the stainless steel plate in the above photo. This Cup attaches to the stainless steel plate on the top of the boot lid, and then the spare wheel sits on top of this Cup. Of course the stainless steel plate cannot take all the strain of the wheel, but then it's not yet fastened down. That's where the knurled wheel comes in.
The Knurled Wheel:

The knurled wheel consists of the knurled top and threaded bar, a metal plate, and a rubber 'washer' that holds the metal plate onto the threaded bar.
When the spare wheel is stowed upon the Cup, the knurled wheel is inserted down through the wheel, through the cup and into the black locking mechanism where it is screwed up tightly. then the spare wheel is properly secured against the spider brace.
The threaded bar has a slot cut into the end of the bar. This is the how the black locking mechanism works, It drops a metal bar into the slot thereby preventing the knurled wheel from being turning and hence being unscrewed.
The Boot Prop:

With the added extra weight of the spare wheel on the boot, the boot springs will no longer hold the boot open, so Rover provided the boot prop. It didn't matter what colour your P6 was, these are always red!
Yes, I've given this a respray as well. this red prop slots into the special bracket that is pop-riveted onto the boot lid. The small black plastic 'fork' shaped piece is a locking mechanism to prevent the red prop from coming out of the bracket and the weight of the boot and wheel landing on your head!
Also, with the extra weight, Rover provided a handle on the boot lid to give you something to lift the boot lid with. Sometimes these are listed on eBay as boot mount handles. Actually they are the same as Series 1 P6 door handles ... just mounted upside down!
The Boot Badge:

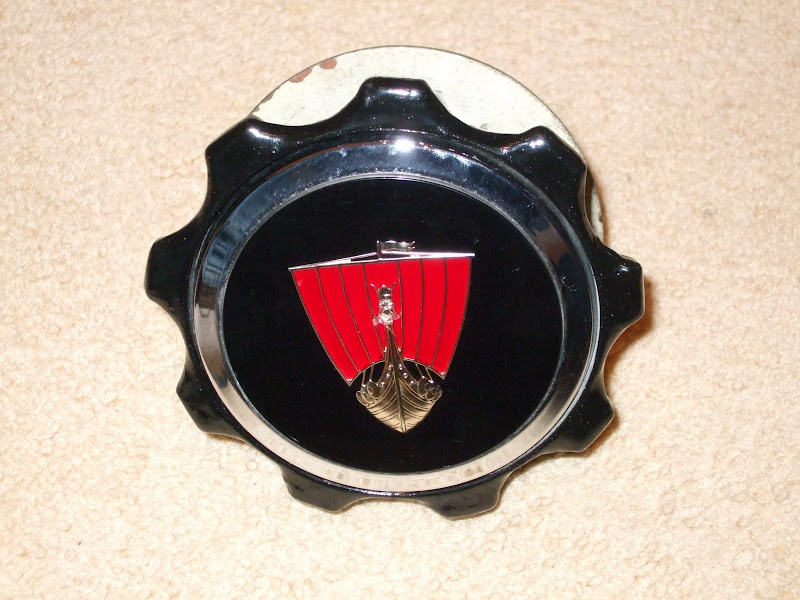
For those times where you just want the spare wheel in the boot, you can't just leave the boot lid exposed to the elements, there's a big hole in it! It has to be covered up. This is the Rover boot mount badge, it is rarer than rocking horse droppings and slots into the bayonet fitting on the stainless steel plate.
A good quality badge really looks the business.
When not in use - because the spare wheel is on the boot, the badge fits into the top of the knurled wheel like this.

<
There are two solutions to this problem, either put the spare wheel on the floor of the boot, or put it externally on the boot lid.
Rover came up with some ingenious solutions for this, the first one, putting the wheel on the boot floor would be fine if your wheel was nice and clean so you didn't mind it coming into contact with your luggage, but what about after a wheel change.... To combat this, Rover came up with the false floor. Here you can see two photos, one showing the wheel and tool bag in the bottom of the boot, and the second with them covered up by a false boot floor.
Here you can see the false floor on the left, folded up, and the wheel , tools etc lying on the boot floor.
And here you can see the false floor laid out. It looks rather good, and it is. However, as can be seen with my power station in the boot, there is excellent width, but very little height. I can now fit a suitcase in, but no longer have the height to fit the cool box doh!!
It is a very neat, but also restricting solution.
The second type of fitment for the spare wheel, is to put it on the outside of the boot lid, thereby giving the whole width and height of the boot for luggage.
The boot mount kit consists of:
A "Spider" brace:
This brace is to replace the existing braces on the inside of the boot lid. The standard boot has two horizontal braces to give the panel strength, these need to be removed (by drilling out the spot welds) and this brace inserted in its place by using pop rivets.
This brace was a second hand (well, hardly going to find any new ones these days are you!) painted black and covered in surface rust. I took the angle grinder / flap disc to it and took it back to bare metal. Gave it a good coat of Jenolite to kill the rust, etch primed it, and then gave it a quick top coat in Almond (same colour as my P6). The colour really isn't that important as it is never seen, but I know it's there, so wanted to give it a top coat. I didn't spend alot of time on it, and it is cold outside (New Years Day 2010) so not good painting conditions, but it is the right colour, even if it doesn't gleam and shine. Damn sight better than a rusty black one!
You can see the middle of the brace has the hole for the fitting kit, and that the spare wheel therefore is actually fitted to the brace and not just the boot lid.
The boot fixing:
This part of the kit fits to the centre of the brace - you can see by the ring of holes in the brace, and matching the picture here. The top of the picture shows the stainless steel plate that is positioned on top of the boot lid. This has a bayonet fitting in the centre (looks oval in the photo) so that the spare wheel fitting is inserted and then twisted to lock. This plate is usually sealed by a sealant of some sort, I'm thinking of using the same stuff that is used to seal windscreens. On the right is a set of four shims (two thick, two thin) these are used as required to fit between the spider brace and the underside of the boot lid to take up any space. The black ring on the left is the locking mechanism. This contains the thread for the knurled wheel (below) to screw the wheel to the boot lid, and also contains a locking mechanism to prevent anyone stealing your spare wheel. This locking mechanism is fitted underneath the spider brace. All these items are screwed together using #10 UNF countersunk screws and nylock nuts.
The "Cup":
The cup is an often misplaced or forgotten item when searching for the boot mount kit. Many old P6's, if they don't have the spare on the boot, but do have the facility, have often 'lost' the Cup, or the people breaking the car for the sale of the parts, often don't understand the significance.
You can just make out on the underside, there is a bayonet fitting that will mate with the stainless steel plate in the above photo. This Cup attaches to the stainless steel plate on the top of the boot lid, and then the spare wheel sits on top of this Cup. Of course the stainless steel plate cannot take all the strain of the wheel, but then it's not yet fastened down. That's where the knurled wheel comes in.
The Knurled Wheel:
The knurled wheel consists of the knurled top and threaded bar, a metal plate, and a rubber 'washer' that holds the metal plate onto the threaded bar.
When the spare wheel is stowed upon the Cup, the knurled wheel is inserted down through the wheel, through the cup and into the black locking mechanism where it is screwed up tightly. then the spare wheel is properly secured against the spider brace.
The threaded bar has a slot cut into the end of the bar. This is the how the black locking mechanism works, It drops a metal bar into the slot thereby preventing the knurled wheel from being turning and hence being unscrewed.
The Boot Prop:
With the added extra weight of the spare wheel on the boot, the boot springs will no longer hold the boot open, so Rover provided the boot prop. It didn't matter what colour your P6 was, these are always red!
Yes, I've given this a respray as well. this red prop slots into the special bracket that is pop-riveted onto the boot lid. The small black plastic 'fork' shaped piece is a locking mechanism to prevent the red prop from coming out of the bracket and the weight of the boot and wheel landing on your head!
Also, with the extra weight, Rover provided a handle on the boot lid to give you something to lift the boot lid with. Sometimes these are listed on eBay as boot mount handles. Actually they are the same as Series 1 P6 door handles ... just mounted upside down!
The Boot Badge:
For those times where you just want the spare wheel in the boot, you can't just leave the boot lid exposed to the elements, there's a big hole in it! It has to be covered up. This is the Rover boot mount badge, it is rarer than rocking horse droppings and slots into the bayonet fitting on the stainless steel plate.
A good quality badge really looks the business.
When not in use - because the spare wheel is on the boot, the badge fits into the top of the knurled wheel like this.